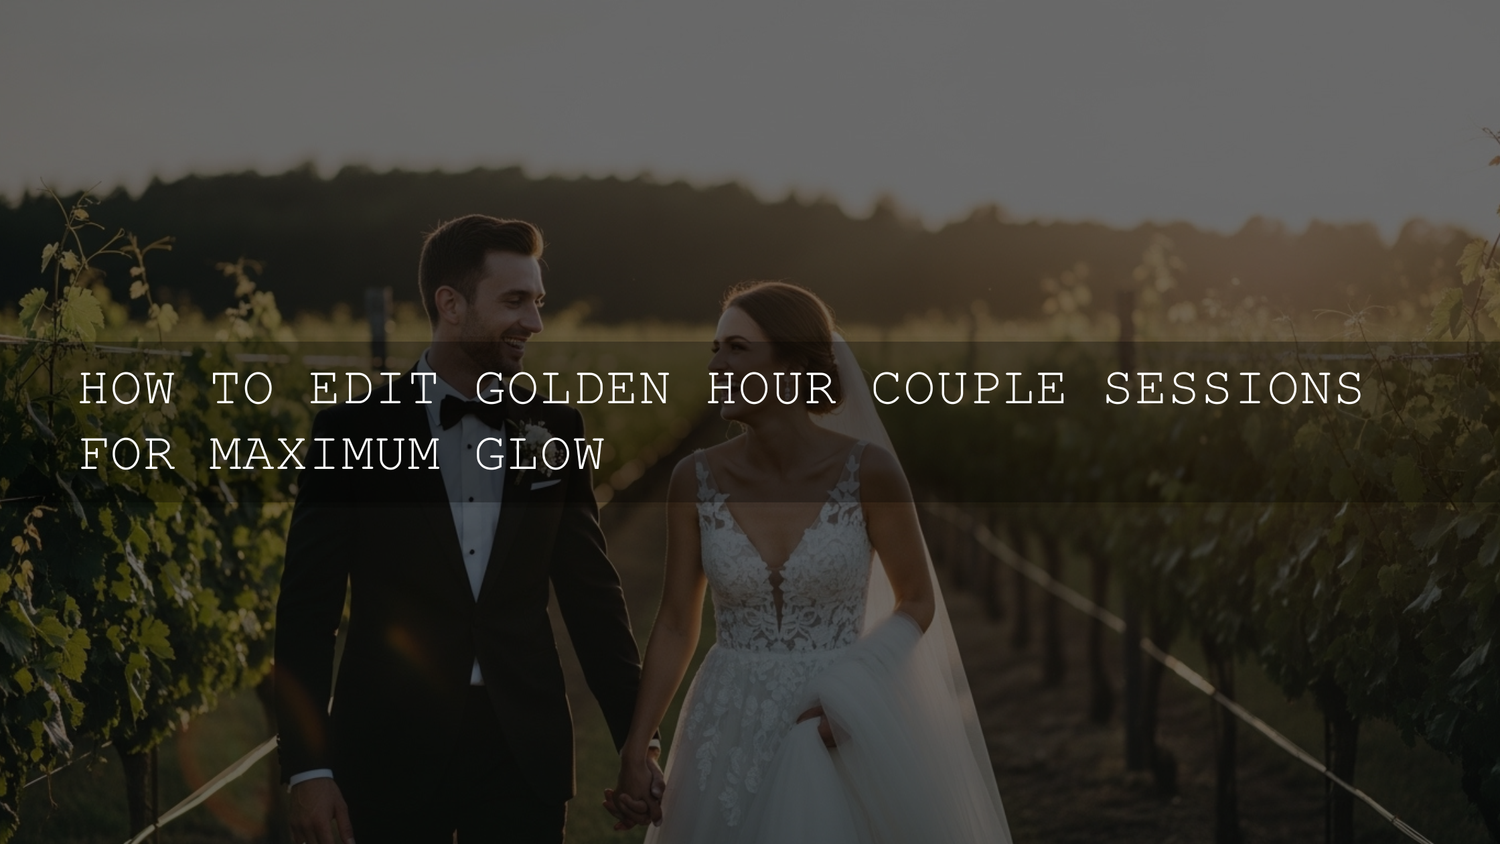
How to Edit Golden Hour Couple Photos for a Warm, Romantic Look in 2026
Golden hour couple photo editing is one of the most rewarding workflows in portrait photography—because the light is already doing half the storytelling for you. When you combine soft sunset light with the right Lightroom presets, careful masking, and a few manual refinements, you can create warm skin tones, glowing highlights, and a romantic atmosphere without making the image look fake. This guide walks through a clean, repeatable process for editing golden hour couple portraits in Lightroom (and optionally Photoshop), with practical tips you can use right away.
If you want a fast starting point before you fine-tune, try the AI-Optimized Cinematic Golden Hour Lightroom Presets and browse the Portrait Photography Lightroom Presets collection. If you’re building a full editing toolkit, you can use the brand offer: Buy 3, Get 9 FREE when you add 12 items to your cart.
Why Golden Hour Couple Sessions Look So Good
There’s a reason photographers plan engagements, anniversaries, and pre-wedding sessions around sunrise or sunset. The light is lower, softer, and warmer than midday sun, which means fewer harsh shadows, smoother transitions on skin, and a naturally romantic mood. In couple photography, that matters because viewers respond first to faces, skin tone, and emotional connection.
Golden hour also gives you beautiful edge light. Hair catches the sun, shoulders glow, and subjects separate from the background without needing aggressive contrast. That natural separation makes your edits easier and your final images feel premium.
Here’s why this matters in post-processing: when the original light is already flattering, editing should support the mood—not overpower it. Your job is to protect highlight detail, keep skin natural, and strengthen the warmth in a controlled way.
Start With a Clean Workflow Before You Touch Color
Before editing sliders, get your workflow organized. This saves time and prevents inconsistent edits across a gallery.
- Import RAW files into Lightroom (or Lightroom Classic).
- Cull first so you only edit the strongest frames.
- Group similar lighting setups (open shade, direct backlight, side light, sunset silhouettes).
- Pick a hero image first and build the look there before syncing.
For couple sessions, I usually separate images into three mini-groups: fully backlit glow shots, balanced face-lit portraits, and wide environmental frames. Each group often needs a slightly different exposure and highlight strategy, even if the same preset is used.
If you want more help building a sunset-friendly preset starting point, this article on the best presets for golden hour and blue hour shots is a useful companion read.
Step 1: Nail White Balance for Warm Skin Tones
Golden hour editing usually goes wrong in one of two ways: the image gets too orange, or the camera neutralizes the warmth and kills the mood. The fix is a controlled white balance pass before anything else.
Start with:
- Temperature: Warm enough to preserve sunset light, but not so warm that skin turns orange.
- Tint: Correct subtle green/magenta shifts, especially in mixed light or reflected grass.
A quick pro tip: don’t judge warmth using the brightest sky area. Judge it on skin and neutral clothing. The sky can go warm; skin still needs to look believable.
I’ve tested this on backlit engagement sessions where the couple is standing in dry grass at sunset—the grass reflection can push skin too yellow fast. A small Tint correction plus slightly reduced yellow saturation often fixes the “muddy warmth” problem without losing the golden mood.
If you struggle with yellow/orange overload, see this guide on fixing overly yellow preset results for extra troubleshooting ideas.
Step 2: Balance Exposure and Protect the Highlights
Golden hour scenes often have bright skies and darker faces, especially in backlit poses. Instead of pushing global exposure too far, use a layered approach:
- Set a balanced overall Exposure for the couple, not the sky.
- Pull down Highlights to recover bright hair rims, sky edges, and dress details.
- Lift Shadows just enough to open faces and clothing texture.
- Adjust Whites/Blacks to restore contrast without clipping.
For a romantic look, avoid crunchy contrast. A softer tonal curve usually feels more elegant, especially for engagement and wedding-style portraits. If the image starts looking flat, add depth with local masks instead of global contrast.
When I’m editing sunset couple galleries, I’d rather preserve a little softness than force “punch.” Couples usually care more about flattering skin and emotion than ultra-hard contrast.
Step 3: Use Presets as a Starting Point, Not the Final Edit
Presets are excellent for speed and consistency, especially when you’re editing a full couple session, but golden hour images still need custom adjustments per frame. Start with a preset that matches the scene mood, then refine exposure, white balance, and skin tones.
Good starting options for this style include:
- AI-Optimized Cinematic Golden Hour Lightroom Presets for soft cinematic warmth and glow.
- AI-Optimized Golden Hour Film Glow Lightroom Presets for a warmer, slightly nostalgic sunset look.
- 50 Wedding Lightroom Presets for Photography if your couple session is closer to bridal or wedding portrait color styling.
If you edit across multiple styles (couples, weddings, portraits, travel), the 1000+ Master Lightroom Presets Bundle gives you more flexibility without rebuilding your workflow from scratch every time.
For bright, soft, wedding-friendly color direction, you may also like these bright and airy preset ideas for lifestyle and wedding photography.
Presets vs Manual Editing for Golden Hour Couple Photos
Both approaches work. The best results usually come from combining them.
- Presets (fast + consistent): Great for building a matching look across an entire gallery. Ideal when you need speed and a consistent brand style.
- Manual editing (precise + flexible): Better for difficult frames with strong backlight, mixed tones, or uneven skin exposure.
- Hybrid workflow (recommended): Apply a preset, then manually adjust white balance, masking, and skin tone HSL for each hero image.
In practice, a hybrid workflow is what keeps your edits both fast and professional. You get the mood from the preset and the polish from manual corrections.
Step 4: Fine-Tune Color With HSL and Color Grading
This is the stage where your golden hour couple photo editing starts to feel intentional. Use HSL and Color Grading to guide the viewer’s eye and keep the palette cohesive.
HSL Adjustments for Skin and Sunset Light
- Orange: Adjust hue and luminance carefully for skin. A slight luminance lift can create healthy glow.
- Red: Reduce saturation if cheeks or lips become too intense.
- Yellow: Watch grass reflections and sunlit backgrounds. Too much yellow can make skin look dirty.
- Blue: Slight desaturation can reduce distractions in sky or clothing and keep focus on the couple.
If your preset looks dramatic but skin starts drifting away from reality, this guide on keeping natural colors while using strong presets is especially helpful.
Color Grading for a Romantic Finish
Use the Color Grading panel to reinforce the mood:
- Highlights: Add a soft warm hue (gold, amber, warm orange).
- Midtones: Keep neutral-to-warm so skin stays natural.
- Shadows: Add a subtle cool tone (very light teal/blue) if you want depth and color contrast, or keep warm for a dreamy monochromatic feel.
A small shift goes a long way. The goal is not “orange everywhere.” The goal is warm light with believable skin and depth.
For color harmony inspiration, Adobe’s official Adobe Color wheel tool can help you visualize warm/cool balance before you commit to a grading direction.
Step 5: Create Glow With Masking Instead of Over-Softening
The signature sunset glow is usually better built with local adjustments than global haze. If you reduce clarity everywhere, skin and clothing textures can turn muddy. Instead, create glow selectively.
Use masks for:
- Faces: Lift exposure slightly, reduce harsh shadows, and add a touch of warmth.
- Hair rim light: Increase highlights or exposure gently to emphasize backlit strands.
- Background light source: Add a radial mask to enhance the sun area and create atmospheric falloff.
- Dress/shirt detail: Recover texture so clothing doesn’t look flat after softening the scene.
Adobe’s official guide to masking in Lightroom and the Lightroom Classic masking documentation are excellent references if you want to get more precise with local edits.
Actionable pro tip: If the face is in shadow but the background is bright, mask the couple and raise exposure there first. Then add a second mask to lower the background highlights slightly. This keeps the image natural while making the couple the visual anchor.
Step 6: Add Soft Contrast and Depth Without Killing the Mood
Golden hour edits often need contrast, but not the hard, crispy kind. Here are better ways to add depth:
- Tone Curve: Use a gentle S-curve with protected shadows.
- Dehaze (very lightly): Add micro-contrast if the image feels too hazy.
- Selective clarity: Add clarity only to clothing texture, hair, or background elements—not skin.
- Vignette (subtle): Darken edges slightly to guide focus toward the couple.
If your images keep turning flat after preset application, this troubleshooting post on fixing washed-out or low-contrast preset results can help you debug quickly.
Step 7: Sharpening, Noise Reduction, and Final Polish
Even golden hour sessions can involve higher ISO values—especially near sunset. Finish strong with a clean polish pass:
- Sharpen for edges, not skin: Use masking in the sharpening panel so eyes, hair, and clothing details get the crispness.
- Reduce noise carefully: Remove distracting grain while preserving natural texture.
- Check skin tones one last time: Zoom out and zoom in; skin should look good both ways.
- Compare to original: Make sure you improved the feeling, not just changed the colors.
A little texture is okay. Over-smoothing is what makes portraits look artificial.
Common Golden Hour Editing Mistakes to Avoid
- Overheating the image: Too much temperature + saturation makes skin look orange.
- Global softening: Reducing clarity too much across the entire image can look muddy.
- Ignoring color casts: Grass, sand, and reflective walls can tint skin unexpectedly.
- Crushed shadows: Romance doesn’t mean losing facial detail.
- Overusing one preset on every frame: Backlit, front-lit, and wide shots usually need different tweaks.
If a preset makes a specific frame too dark, this step-by-step recovery guide on recovering detail when presets look too dark is worth bookmarking.
A Practical Editing Recipe You Can Test Today
If you want a quick workflow for your next sunset couple session, try this:
- Apply a golden hour preset.
- Correct white balance for skin first.
- Lower highlights and lift shadows slightly.
- Refine orange/yellow HSL for skin and reflected light.
- Mask the couple and brighten faces subtly.
- Add a soft warm highlight grade.
- Sharpen edges only, then export.
I tested a version of this workflow on a low-light couple session where the sun dropped behind trees faster than expected, and it saved the gallery. The preset gave me instant consistency, but the local masks were what made the skin tones and eye contact feel premium.
If you’re editing engagement sessions, sunset portraits, or wedding couple photos regularly, explore the Wedding Lightroom Presets collection and keep the 50 Wedding Lightroom Presets for Photography pack in your workflow for softer, timeless color options.
Tools, Support, and Learning Resources
For beginners and pros alike, it helps to keep official references nearby when learning a new tool or refining your workflow. If you want to deepen your Lightroom editing process, check Adobe’s official Lightroom page for feature overviews and workflow options, then use the masking guides linked above while practicing on real images.
If you need help with store-related questions, downloads, or support while building your preset toolkit, you can also visit the AAAPresets contact page.
Bring the Feeling Back Into the Frame
The best golden hour couple photo editing doesn’t scream “edited.” It feels like the moment looked in real life—just cleaner, warmer, and more emotionally focused. Preserve skin tone realism, protect highlight detail, and use masks to shape light where it matters most.
If you’re ready to build a faster sunset workflow, start with the AI-Optimized Cinematic Golden Hour Lightroom Presets, test the warmer look from the Golden Hour Film Glow Lightroom Presets, and browse the Portrait Photography Lightroom Presets collection for more couple-friendly styles. If you want maximum variety for different sessions, the 1000+ Master Lightroom Presets Bundle is a strong all-in-one option—and you can still use Buy 3, Get 9 FREE when adding 12 items to your cart.
FAQs
Do I need a preset to edit golden hour couple photos?
No—manual editing works well. But a good preset speeds up your workflow and helps keep the gallery consistent, especially when you’re editing multiple sunset images from the same session.
Why do my golden hour photos look too orange after editing?
This usually comes from stacking too much warmth: high temperature, strong yellow/orange saturation, and warm color grading together. Pull back yellow saturation, check tint, and judge the image by skin tone instead of the sky.
What’s the best way to make faces brighter in backlit couple portraits?
Use local masking on the couple instead of pushing global exposure. Brighten faces and lift shadows slightly, then reduce background highlights so the image stays balanced and natural.
Can I use these Lightroom workflows for engagement and wedding photos too?
Yes. Golden hour editing techniques are ideal for engagement sessions, wedding portraits, and anniversary shoots because they prioritize flattering skin tones, soft contrast, and emotional warmth.
Should I edit golden hour images differently for mobile and desktop Lightroom?
The core workflow is the same, but desktop gives you more precision for batch editing and fine masking. Mobile is great for quick edits and previews, especially if your presets include DNG versions.
Written by Asanka — creator of AAAPresets (10,000+ customers).

Leave a comment
This site is protected by hCaptcha and the hCaptcha Privacy Policy and Terms of Service apply.