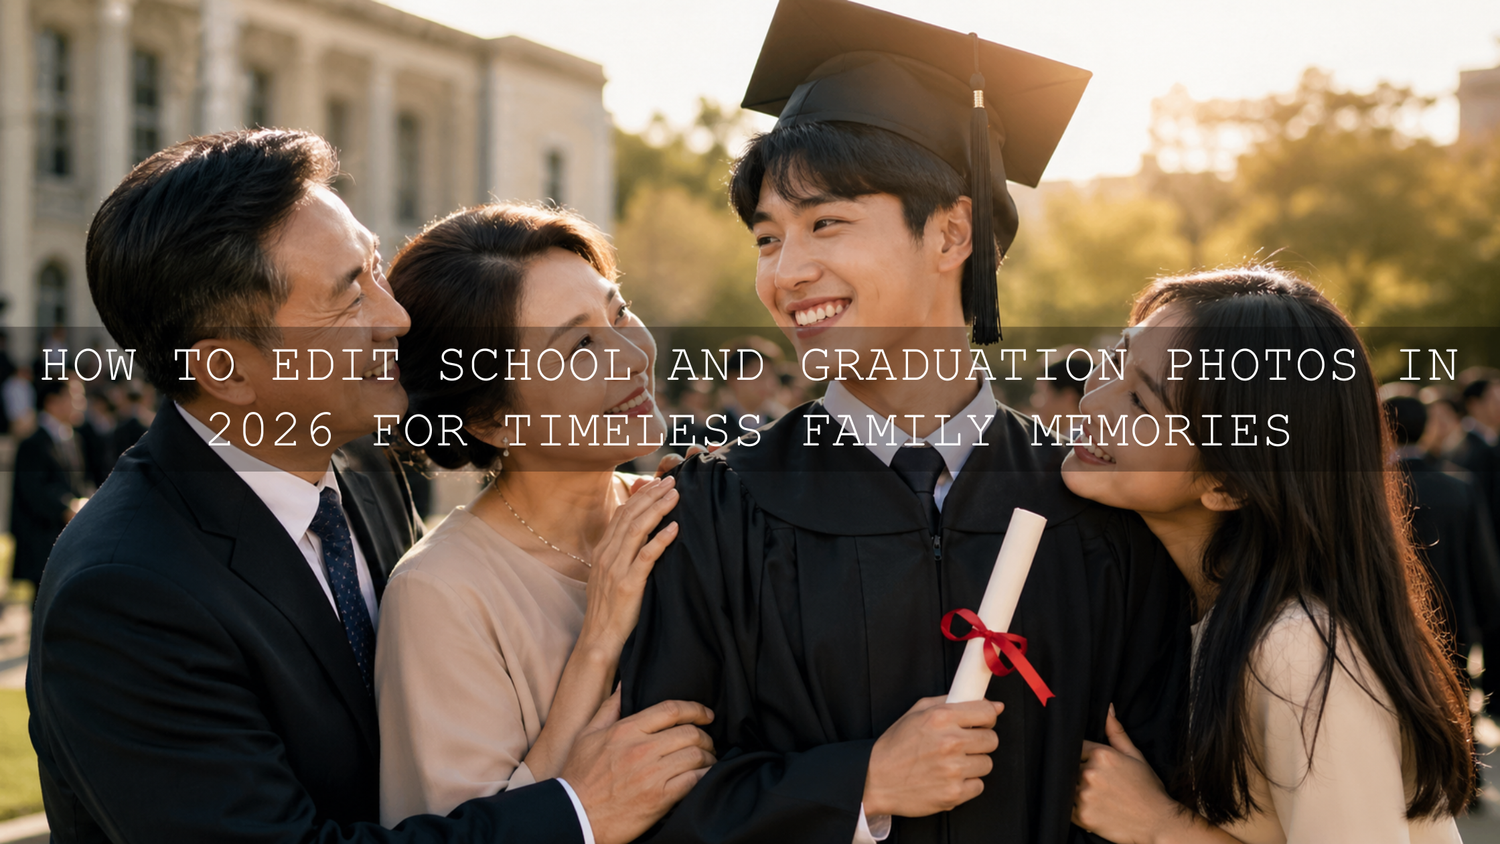
How to Edit School and Graduation Photos in 2026 for Timeless Family Memories
Learning how to edit school and graduation photos in 2026 is about more than making a picture brighter. These photos carry the story of a child growing up: the first school uniform, the nervous smile on picture day, the proud graduation portrait, the family hugs after the ceremony, and the small moments that become priceless later. A good edit should make those memories feel clean, warm, polished, and natural without making skin tones look fake or the colors too heavy.
Here’s why this matters: school and graduation photos are often captured in difficult lighting. You may have bright outdoor sun, indoor classroom shadows, mixed hall lighting, crowded backgrounds, shiny graduation gowns, colorful decorations, and fast-moving family moments. The goal is not to make every image look over-edited. The goal is to protect the real feeling of the day while giving every photo a professional, consistent finish.
For a faster starting point, try the Clean & Classic Cinematic Lightroom Presets for polished school portraits and graduation photos, then browse the Lightroom Presets for Lightroom Mobile and Desktop collection for more portrait, family, lifestyle, and event editing styles. Try these presets today — Buy 3, Get 9 FREE.
Start With the Real Story Behind the Photo
Before you touch exposure, contrast, or color, ask one simple question: what should this photo feel like?
A kindergarten photo may need a soft, bright, innocent look. A school sports award photo may need clean contrast and energy. A graduation portrait may need a more timeless, cinematic finish. A candid photo with grandparents may need warmth and softness more than sharp commercial contrast. When you know the emotional goal first, your editing becomes much easier.
I tested this kind of preset-first workflow on family and portrait galleries, and the biggest improvement was consistency. Once the photos were grouped by lighting and edited with a matching base look, the whole gallery felt more complete before any detailed retouching started.
For larger family sets, the same idea applies: sort your photos before editing. Put indoor classroom photos in one group, outdoor ceremony photos in another, and formal portraits in a separate group. This helps you avoid applying one edit to every photo and wondering why some images look too warm, too dark, or too strong. For a deeper workflow, read this guide on speeding up large family galleries with presets.
Choose a Timeless Look for School and Graduation Portraits
School and graduation portraits should age well. That means avoiding extreme filters, overly orange skin, crushed shadows, or colors that feel trendy for only one season. A timeless edit usually has balanced exposure, clean whites, soft highlight control, natural skin tones, and enough contrast to make the subject stand out.
The Clean & Classic Cinematic Lightroom Presets are a strong match for this style because they are built for natural color, balanced contrast, and a polished film-inspired finish. They work especially well for portraits, lifestyle photos, family photos, everyday storytelling images, and graduation portraits where you want a clean result without losing the real mood of the day.

Adobe explains that Lightroom presets are pre-defined settings that can apply adjustments such as exposure, contrast, saturation, and color grading, which makes them useful as a starting point for consistent edits. You can learn more from Adobe’s official guide to editing photos with presets in Lightroom.
After applying a preset, do not stop there. A preset gives you the base look, but your photo still needs small adjustments based on the real lighting. For school and graduation photos, focus on these areas first:
- Exposure: brighten the face without blowing out the shirt, gown, or background.
- White balance: correct yellow indoor light, blue shade, or green classroom light.
- Highlights: protect bright white shirts, certificates, gowns, and skies.
- Shadows: lift dark areas gently so the image feels clean but not flat.
- Texture and clarity: add detail carefully, especially around faces.
Presets vs Manual Editing: Which Is Better for Family Milestones?
Presets and manual editing both have a place in school and graduation photo editing. The best workflow is usually not one or the other. It is a combination of both.
Presets
Presets are best when you want speed, consistency, and a professional base look. They are especially helpful when editing many photos from the same event, such as a graduation ceremony, school awards day, kindergarten album, or family celebration. A preset can help you keep the same color mood across the full gallery instead of making each photo look unrelated.
Manual Editing
Manual editing is best for small corrections that make each image feel natural. After applying a preset, you may still need to adjust white balance, crop the frame, brighten the face, reduce highlights, or clean up distractions. This is where your personal judgment matters.
Think of presets as the foundation and manual editing as the final polish. For example, you might apply a clean cinematic preset to a graduation portrait, then slightly lower the highlights on the gown, warm the skin tone, crop out a distracting sign, and use a mask to brighten the face. That final 10% is what makes the photo feel personal and professional.
If you want to understand how Lightroom can handle more natural portrait work, this guide on realistic Lightroom portrait retouching in 2026 is a helpful next read.
Fix Skin Tones Before You Push the Colors
Skin tone is the most important part of school and graduation photo editing. If the face looks too orange, red, gray, green, or washed out, the whole image feels wrong even if the background looks beautiful.
Start with white balance. Indoor school photos often have yellow or green color casts from artificial lights. Outdoor graduation photos may have blue shade or harsh sunlight. In Lightroom, use the Temperature and Tint sliders to bring the face back to a natural look before you increase vibrance or saturation.
Adobe’s Lightroom editing tools include white balance controls, masks, color adjustments, and other tools that help refine photos more precisely. You can explore the official overview in Adobe’s guide to editing photos in Lightroom desktop.
A simple skin tone workflow:
- Apply your preset or base edit.
- Adjust exposure until the face looks clear.
- Correct white balance before changing saturation.
- Lower highlights if the forehead, shirt, gown, or certificate is too bright.
- Use Color Mixer or HSL gently if reds, oranges, or yellows look too strong.
- Zoom out and check if the person still looks natural.
For mixed skin tones in family photos, avoid editing only for one person. Adjust the global color first, then use local masks if one face needs slightly more brightness or warmth. This is especially useful for group graduation photos where people are standing under different patches of light. You can also read this guide on making Lightroom presets work better on every skin tone.
Use Masks to Make the Subject Stand Out
Masks are one of the best tools for school and graduation portraits because they let you adjust the subject without changing the whole image. If the background is bright but the face is slightly dark, a mask can lift the face without making the sky too bright. If the background is distracting, a background mask can reduce brightness or clarity so the subject becomes the focus.
Adobe’s Lightroom masking tools can automatically select subjects, backgrounds, objects, and people, making local adjustments easier for portraits and event photos. For more detail, see Adobe’s official guide to masking in Lightroom.
For school and graduation photos, try these mask-based edits:
- Face mask: slightly raise exposure and shadows for a cleaner portrait.
- Eye detail: add a tiny amount of sharpness or clarity, but keep it natural.
- Background mask: lower exposure or saturation if the background is too busy.
- Clothing mask: recover highlights on white shirts, gowns, or uniforms.
- Sky or outdoor background mask: reduce highlights so the ceremony setting stays visible.
Pro tip: do not make the face brighter than the rest of the scene in an obvious way. The best local edits are invisible. People should notice the memory, not the editing.
Edit Outdoor Graduation Photos With Clean Warmth
Outdoor graduation photos often look beautiful, but they can also be tricky. Direct sunlight creates harsh shadows. White gowns and shirts can lose detail. Green grass can reflect onto skin. Blue shade can make faces look cold. This is where controlled warmth and highlight protection are important.
For outdoor video portraits, graduation reels, family ceremony clips, and natural light footage, the Traditional Outdoor Portrait LUTs Pack is a useful choice. It includes .CUBE LUTs designed for outdoor portraits, family sessions, weddings, events, cultural shoots, and natural light videos. The look is built around clean skin tones, warm cinematic contrast, and balanced outdoor color.

For best results with outdoor graduation photos and videos:
- Expose for the face, not the sky.
- Keep white balance close to neutral before applying a strong look.
- Reduce highlights to protect bright gowns, certificates, and shirts.
- Add warmth carefully so skin stays natural.
- Use contrast to add depth, but avoid crushing shadow detail.
If you are editing photos instead of video, a portrait-friendly Lightroom preset may be easier. If you are editing graduation clips, reels, or family event videos, LUTs can help keep the color grade consistent across multiple clips. For more browsing, explore the Portrait Photography Lightroom Presets collection for face-friendly photo looks.
Create a Graduation Story With Video and Slideshows
School and graduation memories are not only about single photos. Sometimes the most emotional result comes from showing the full journey: first day of school, sports day, class photos, awards, family moments, and finally the graduation ceremony. A short vertical video can turn those memories into a powerful story for Instagram Reels, TikTok, YouTube Shorts, or a family keepsake.
The Newspaper History Slideshow in Premiere Pro for Reels, Shorts & TikTok is a creative way to present school and graduation milestones. Its vintage newspaper style works well for timeline edits, “how it started vs how it’s going” videos, biography-style graduation reels, family archive stories, and event recaps.

A simple graduation slideshow structure:
- Start with the earliest school photo.
- Add 3–5 important moments from the school journey.
- Include one proud portrait or award moment.
- End with the graduation photo or family celebration.
- Keep the color style consistent so the video feels complete.
When exporting vertical videos, keep your final platform in mind. Adobe provides an official overview of export settings in Premiere, including video settings that vary depending on the chosen format. You can review Adobe’s Premiere export settings reference before preparing files for social platforms. For more practical short-form video tips, read this AAAPresets guide on export settings for Instagram Reels, TikTok, and YouTube Shorts.
Step-by-Step Lightroom Workflow for School and Graduation Photos
Let’s break it down into a simple workflow you can repeat for almost any school or graduation photo.
1. Select the Best Images First
Do not edit every photo immediately. Choose the sharpest expressions, cleanest compositions, and strongest emotional moments. Keep the photos where the eyes are clear, the face is visible, and the story feels meaningful.
2. Correct Exposure and White Balance
Before applying heavy color edits, make the image technically clean. Brighten the face, lower extreme highlights, and correct warm or cool color casts. This gives your preset a better starting point.
3. Apply a Preset as Your Base Look
Choose a preset that matches the mood. For clean graduation portraits, use a timeless cinematic look. For bright family moments, use a softer lifestyle style. For a full library of options, the 1000+ Master Lightroom Presets Bundle can help when you need multiple looks for portraits, events, travel, lifestyle, and family galleries.
4. Fine-Tune the Face
Use small adjustments to protect skin tones. If the skin is too red, reduce red or orange saturation slightly. If the face is too dark, use a subject mask and lift exposure gently. If the image looks flat, add a little contrast or black point.
5. Clean the Background
Graduation ceremonies and school events often have signs, chairs, bags, wires, people, and bright objects in the background. Crop first. If the distraction remains, use Lightroom’s remove tools carefully. Adobe’s official guide to removing distractions with Lightroom’s Remove tool explains how unwanted objects can be removed while blending the result into the surrounding image.
6. Add Final Sharpening and Export
Sharpen the final photo based on where it will be used. For social media, a clean and sharp face matters. For prints, avoid over-sharpening skin and keep the file high quality. If you plan to edit on mobile, this guide on adapting Lightroom Mobile presets to different lighting will help you get more consistent results.
Common School and Graduation Editing Mistakes to Avoid
Even beautiful moments can lose their charm if the edit goes too far. These are the most common mistakes to watch for:
- Over-smoothing skin: children and graduates should still look real, not plastic.
- Too much orange warmth: warm edits are nice, but orange skin looks unnatural.
- Crushed shadows: deep contrast can hide uniforms, gowns, hair, and background detail.
- Over-bright whites: certificates, shirts, and graduation gowns can lose texture quickly.
- Inconsistent gallery color: one photo should not look cool blue while the next looks golden orange unless it is intentional.
- Ignoring the crop: a simple crop can remove distractions and make the portrait feel more professional.
My rule is simple: if the edit pulls attention away from the child, graduate, or family emotion, reduce the effect. The best school and graduation photo editing should feel polished but honest.
Related Reading
- Realistic Lightroom portrait retouching for natural faces in 2026
- How to speed up large family galleries with presets
- How to make Lightroom presets work on every skin tone
- How to adapt Lightroom Mobile presets to different lighting
- Premiere Pro export settings for Reels, TikTok, and YouTube Shorts
Final Thoughts: Make the Memory Feel Real, Not Over-Edited
Editing school and graduation photos in 2026 is about honoring the moment. The best edit brings out the pride, joy, warmth, and personality already inside the photo. It should clean up the lighting, improve the colors, protect the skin tones, and create a consistent finish without making the memory feel artificial.
Use presets when you need speed and consistency. Use manual adjustments when the photo needs care. Use masks when the subject needs extra attention. Use LUTs when you want consistent color in graduation videos. And most importantly, edit with the story in mind.
To build a simple editing toolkit for school portraits, family galleries, and graduation memories, start with the Clean & Classic Cinematic Lightroom Presets, explore the Traditional Outdoor Portrait LUTs Pack for video, and browse the Lightroom Presets for Lightroom Mobile and Desktop collection for more family, portrait, and event styles. Add 12 items to your cart and pay for only 3 with Buy 3, Get 9 FREE.
FAQ
What is the best way to edit school and graduation photos?
The best way is to start with clean exposure and white balance, apply a natural preset as a base, then fine-tune skin tones, highlights, shadows, crop, and background distractions. Keep the edit timeless instead of overly trendy.
Are Lightroom presets good for graduation portraits?
Yes. Lightroom presets are useful for graduation portraits because they help create a consistent look across many photos. The key is to adjust exposure, white balance, and skin tones after applying the preset so the result still looks natural.
How do I make graduation photos look professional?
Use good cropping, clean skin tone correction, balanced contrast, soft highlight recovery, and subtle subject masking. Avoid over-saturation and extreme sharpening. A professional edit should make the subject stand out without looking artificial.
Can I edit school photos on Lightroom Mobile?
Yes. Lightroom Mobile can be used for school and graduation photo editing, especially when working with DNG presets. You can apply a preset, adjust light and color, use masking tools, and export the image for social media or family sharing.
Should I use LUTs for graduation videos?
Yes, LUTs are helpful for graduation videos when you want consistent color across clips. Apply a LUT after correcting exposure and white balance, then fine-tune contrast and saturation so skin tones stay natural.
Written by Asanka — creator of AAAPresets (10,000+ customers).
Leave a comment
This site is protected by hCaptcha and the hCaptcha Privacy Policy and Terms of Service apply.