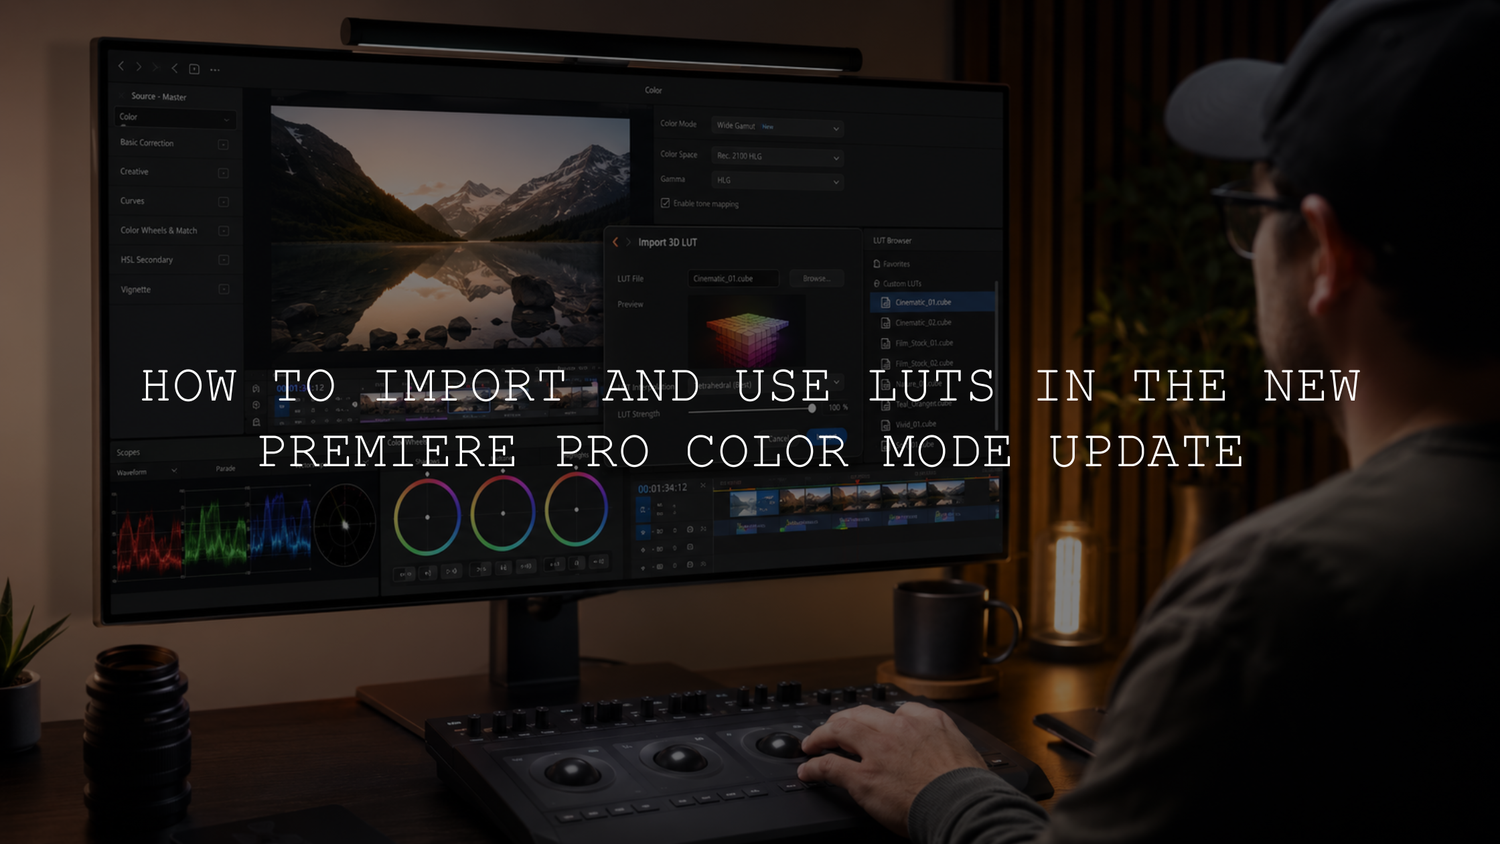
How to Import LUTs in the New Premiere Pro Update
Quick answer: To import LUTs in the new Premiere Pro update, open the Color workspace, select your clip or adjustment layer, click the + button in the Color Controls panel, choose Add Clip LUT, and select your extracted .cube LUT file. After the LUT is applied, reduce or increase the Intensity setting until the look feels natural.
If you recently opened Premiere Pro Beta or the newer Color Mode workflow, LUT importing may feel different from the older Lumetri Color layout. Many editors are used to going straight into Lumetri Color, choosing a Look dropdown, or browsing from the Basic Correction panel. In the new workflow, the fastest method is often the Add Clip LUT option inside the Color workspace.
This matters because LUTs are still one of the easiest ways to create a consistent color style for YouTube videos, Instagram Reels, TikToks, wedding films, anime-style edits, travel videos, music videos, and cinematic client projects. The interface has changed, but your .cube LUTs still work.
If you want to test the workflow with a creative anime-style color grade, try the Japan Anime Look LUTs Pack or browse more looks in the Premium LUTs for Premiere Pro collection. Try these LUTs today — Buy 3, Get 9 FREE.
What Changed in the New Premiere Pro Color Mode?
The new Premiere Pro Color Mode workflow gives editors a more focused space for color correction and color grading. Instead of relying only on the older Lumetri Color panel, the Color workspace places grading controls closer to the viewer and makes clip-level color adjustments feel more direct.
Here’s why this can confuse users: the older Lumetri workflow trained many editors to import LUTs through familiar dropdown menus. In the newer Color Mode layout, LUTs may not appear where you expect them, especially in Beta builds where panels and controls can change as Adobe tests new features.
The easiest method is usually:
- Open the Color workspace.
- Select the clip or adjustment layer.
- Click the + button in the Color Controls panel.
- Choose Add Clip LUT.
- Select the extracted .cube LUT file.
- Adjust Intensity after the LUT is applied.
Adobe also explains that LUTs can be used to change saturation, contrast, and the overall color appearance of a clip in its official guide to adding Look-Up Tables in Premiere Pro. So even if the interface looks new, the purpose is the same: a LUT gives your footage a repeatable color transformation that you can refine with manual controls.
Before You Import LUTs: Extract the ZIP File First
Most LUT packs are downloaded as a ZIP file. Premiere Pro cannot properly read a LUT while it is still inside a compressed ZIP folder. Before you import anything, extract the folder and look for files ending in .cube.
- Download your LUT pack.
- Right-click the ZIP file and choose Extract, Unzip, or Extract All.
- Open the extracted folder.
- Find the LUT files that end with .cube.
- Keep that folder somewhere easy to find, such as your Desktop, Downloads, or an editing assets folder.
A simple mistake I see often is trying to import the ZIP file itself. If Premiere Pro does not show the LUT, check the file extension first. You need the actual .cube file, not the compressed download folder.
How to Import LUTs Using Add Clip LUT
The fastest way to import LUTs in the new Premiere Pro Color Mode update is through Add Clip LUT. This method is useful when your LUT does not show automatically in a dropdown menu or when you want to quickly test one LUT on a selected clip.
- Open your video project in Premiere Pro.
- Go to the Color workspace.
- Select the video clip or adjustment layer you want to grade.
- In the Color Controls panel, click the + button.
- Choose Add Clip LUT.
- Browse to your extracted LUT folder.
- Select the .cube LUT file.
- Once the LUT is applied, adjust the Intensity control.
- Fine-tune exposure, contrast, saturation, highlights, and skin tones if needed.
I tested this workflow with anime-style LUTs, cinematic LUTs, and softer film looks, and the best results came when the LUT was treated as a creative starting point instead of a final one-click grade. For example, an anime LUT may look beautiful on footage with clean daylight, strong color separation, and clear highlights, but it may need lower intensity on darker indoor footage.
For more traditional workflows, you can also read our older guide on how to use LUTs in Premiere Pro. That guide is still helpful for understanding the Lumetri method, while this article focuses on the newer Color Mode workflow.
Watch the Premiere Pro LUT Import Video Guide
We also created a short video guide showing how to import LUTs in the new Premiere Pro Color Mode update. You can follow the same steps visually here: Premiere Pro Color Mode LUT import video guide.
This is especially helpful if you are using Premiere Pro Beta 26.3.0 or another build where the color controls look different from tutorials made for older versions.
How to Use a LUT After Importing It
After importing a LUT, Premiere Pro applies the look to your selected clip or adjustment layer. The next step is not exporting immediately. The next step is checking whether the LUT fits your footage.
Use this clean workflow:
- Apply the LUT with Add Clip LUT.
- Lower the Intensity if the look feels too strong.
- Fix exposure if the video is too bright or too dark.
- Adjust contrast if the image feels flat or too harsh.
- Check white balance so the scene does not look too warm or too cold.
- Look carefully at skin tones if people are in the footage.
- Preview the before and after before exporting.
Adobe notes in its basic color correction options for Premiere Pro that LUTs can be used as a starting point, then refined with other color controls. That is the key idea: apply the look, then polish the image.
Presets vs Manual Editing: Which Is Better?
LUTs and manual grading are not enemies. They work best together.
LUTs are best when you want speed, consistency, and a strong creative direction. They help you create a repeatable look across a full project, especially when you are editing many clips for social media, YouTube, music videos, travel content, or wedding films.
Manual editing is best when the footage needs correction. If one clip is underexposed, another is too warm, and another has strong green shadows, manual adjustments help you balance those clips before or after applying the LUT.
In practice, the best workflow is:
- Correct the footage first if it is too dark, too bright, or badly balanced.
- Apply your creative LUT.
- Reduce the intensity if needed.
- Make final manual adjustments for exposure, contrast, color, and skin tones.
If you want a deeper creative workflow, our guide to using LUTs for cinematic color in Premiere Pro explains how LUTs and manual color grading can work together for a more polished final result.
Should You Apply LUTs to a Clip or an Adjustment Layer?
You can apply a LUT directly to a single clip, but in many editing projects, an adjustment layer gives you more control.
Use a clip LUT when
- You only want to grade one specific clip.
- The clip has a different camera profile from the rest of the timeline.
- You are testing several looks quickly.
- You want each shot to have a separate color grade.
Use an adjustment layer when
- You want the same LUT across multiple clips.
- You are editing Reels, Shorts, TikToks, or YouTube videos.
- You want to turn the grade on and off easily.
- You want a cleaner timeline workflow.
For example, if you are editing a travel montage, applying one LUT to an adjustment layer can quickly create a consistent cinematic mood across the full sequence. Then you can still adjust individual clips underneath if one shot is too dark or too saturated.
For anime-style edits, start with footage that already has clean lighting, visible color, and strong separation between the subject and background. Then apply a pack like the Anime Look Inspired Premium LUTs Pack and adjust the intensity until the look feels stylized but not overdone.
How to Install LUTs Permanently in Premiere Pro
If you use the same LUTs often, you may want to install them permanently so they appear inside Premiere Pro without browsing manually every time. This is helpful for editors who use a regular set of cinematic LUTs, anime LUTs, wedding LUTs, music video LUTs, or vintage film LUTs.
For creative LUTs, place your .cube files inside the Creative folder.
Mac LUT installation folder
~/Library/Application Support/Adobe/Common/LUTs/Creative
Windows LUT installation folder
C:\Users\[Your Username]\AppData\Roaming\Adobe\Common\LUTs\Creative
If the LUTs or Creative folder does not exist, create it manually. Make sure the folder names are spelled exactly like this:
LUTs > Creative
After copying the LUT files into the folder, fully close Premiere Pro and open it again. Premiere Pro usually needs a restart before the LUT list refreshes.
If you edit many different styles, a larger pack like 700+ Cinematic Video LUTs gives you more creative options for travel, wedding, YouTube, music video, and social content. You can also browse the wider Cinematic LUTs Pack collection for Premiere Pro, DaVinci Resolve, Final Cut Pro, and more.
Creative LUT vs Technical LUT
A Creative LUT is used to create a visual style. This includes anime color, cinematic tones, vintage film looks, warm travel grades, moody wedding edits, and social media color styles.
A Technical LUT is usually used for camera color conversion, such as converting log footage into a standard viewing color space. For example, if your camera records flat log footage, a technical LUT may help normalize the image before you add a creative look.
Adobe’s Premiere Pro color management overview is useful if you want to understand how color spaces and color-managed workflows affect your footage before grading.
For most AAAPresets creative LUT packs, including anime LUTs, cinematic LUTs, wedding LUTs, travel LUTs, and vintage LUTs, you are usually working with a creative look. Apply it after your basic correction, then adjust intensity and manual controls to match your footage.
Why Your LUT Is Not Showing in Premiere Pro
If your LUT is not showing in the new Premiere Pro update, it does not always mean the LUT is broken. Most of the time, the issue is related to the file type, folder location, ZIP file, or the Beta version not refreshing correctly.
Try these fixes:
- Make sure the LUT pack is fully extracted.
- Confirm you are selecting a .cube file.
- Do not import the ZIP file itself.
- Restart Premiere Pro after installing LUTs permanently.
- Check that the folder is named Creative.
- Use Add Clip LUT and browse manually.
- Try the regular public version of Premiere Pro if the Beta build behaves unexpectedly.
- Make sure the LUT file has not been moved, renamed, or deleted after import.
Here’s a simple real-world example: if a customer downloads an Anime LUT pack and leaves it inside the ZIP folder, Premiere Pro may not find the actual LUT file. Once the ZIP is extracted and the .cube file is selected through Add Clip LUT, the LUT usually applies correctly.
If you are still having trouble, you can check our FAQ and installation help page for more support resources.
Best Settings After Applying a LUT
A LUT can change the mood quickly, but the final quality depends on small adjustments. Before exporting, check these settings:
- Exposure: Make sure the image is not too bright or too dark.
- Contrast: Reduce harsh contrast if shadows look crushed or highlights feel too strong.
- Saturation: Lower saturation if the colors look unnatural.
- White balance: Fix temperature if the video looks too orange, blue, green, or magenta.
- Skin tones: Check faces carefully so people still look natural.
- Highlights: Reduce highlights if bright areas are distracting.
- Shadows: Lift shadows slightly if important details disappear.
My personal rule is simple: if the viewer notices the LUT before the story, reduce the intensity. A good LUT should support the video, not overpower it.
Best Uses for LUTs in the New Premiere Pro Update
LUTs are helpful when you want a consistent style across many clips. They are especially useful for creators who need to edit faster without making every color decision from scratch.
You can use LUTs for:
- YouTube videos
- Instagram Reels
- TikTok videos
- Short films
- Anime-inspired edits
- Travel videos
- Wedding films
- Music videos
- Product videos
- Cinematic social media edits
If you like softer emotional color, the Anime Dreamy Film Look LUTs Pack is a good match for fantasy edits, cosplay clips, lifestyle videos, and storytelling scenes. If you want to explore more classic video color styles, read our guide on vintage film color grades in Premiere Pro.
Important Note About Premiere Pro Beta
If you are using Premiere Pro Beta, remember that the interface can change. Options may move, panels may be renamed, and LUT lists may not refresh the same way as the regular public version.
For important client work, it is safer to use the regular public version of Premiere Pro or duplicate your project before testing a Beta workflow. Beta software is useful for learning new features, but it is not always the best choice for deadline-heavy client projects.
For a more advanced cinematic workflow, you may also like our guide to Hollywood film emulation in Premiere Pro, especially if you want to combine LUTs with manual color correction.
Related Reading
- How to Use LUTs in Premiere Pro
- Step-by-Step Guide to Using LUTs in Premiere Pro
- How to Create Vintage Film Color Grades in Premiere Pro
- Fall LUTs That Make Your Video Colors Pop
- Hollywood Film Emulation Workflow in Premiere Pro
Final Thoughts
The new Premiere Pro Color Mode update changes where many editors import and adjust LUTs, but the workflow is still simple once you know where to look. Open the Color workspace, select your clip or adjustment layer, click the + button, choose Add Clip LUT, and select your extracted .cube LUT file.
For a permanent setup, copy your LUT files into the Adobe/Common/LUTs/Creative folder and restart Premiere Pro. After applying the LUT, adjust intensity, exposure, contrast, saturation, white balance, highlights, shadows, and skin tones for the cleanest result.
Ready to create stronger color grades faster? Start with the Japan Anime Look LUTs Pack, explore the 700+ Cinematic Video LUTs bundle, or browse more styles in our Premiere Pro LUTs collection. Try these LUTs today — Buy 3, Get 9 FREE.
FAQs
How do I import LUTs in the new Premiere Pro Color Mode update?
Open the Color workspace, select your clip or adjustment layer, click the plus button in the Color Controls panel, choose Add Clip LUT, and select your extracted .cube LUT file. After applying it, adjust the intensity to match your footage.
Why is my LUT not showing in Premiere Pro?
Your LUT may not show if the ZIP file is not extracted, the wrong file type is selected, the LUT is in the wrong folder, or Premiere Pro has not been restarted. Use Add Clip LUT and manually browse to the .cube file if needed.
Where do I install LUTs on Mac for Premiere Pro?
On Mac, place creative LUTs in ~/Library/Application Support/Adobe/Common/LUTs/Creative. If the LUTs or Creative folder does not exist, create it manually, copy the .cube files, and restart Premiere Pro.
Where do I install LUTs on Windows for Premiere Pro?
On Windows, place creative LUTs in C:\Users\[Your Username]\AppData\Roaming\Adobe\Common\LUTs\Creative. After copying the LUT files, fully close and reopen Premiere Pro so the program can refresh the LUT list.
Should I apply LUTs to clips or adjustment layers?
Apply a LUT directly to a clip when you only want to grade one shot. Use an adjustment layer when you want the same LUT across multiple clips, such as a full Reel, YouTube section, travel montage, wedding highlight, or music video sequence.
Written by Asanka — creator of AAAPresets (10,000+ customers).
Leave a comment
This site is protected by hCaptcha and the hCaptcha Privacy Policy and Terms of Service apply.